
For organizers
Ticketing
Tiers, prices, and messages are yours to set. Evittone handles the payment, issues the QR code, and scans it at the door.
A ticket is what gets an attendee through the door. A booked seat is not.
Ticketing on Evittone is two separate things: seats, which hold a place in the room, and tickets, which get someone in. Organizers turn on whichever one the event needs, and both can run on the same event.
Ticket tiers
-
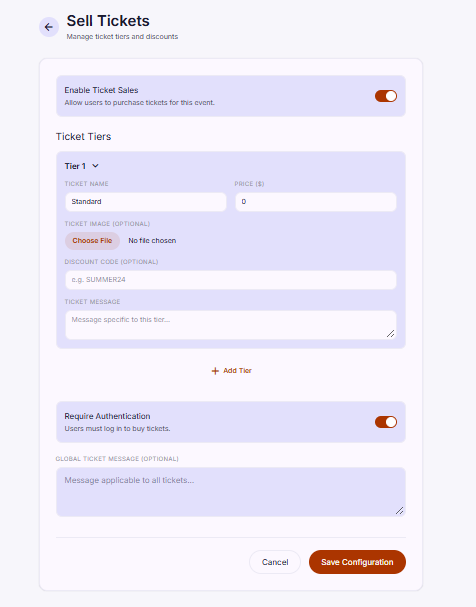
Open the event and go to the ticketing module.
-
The first tier is Standard. It is always there.
-
Add more tiers in any number, with any names you want: VIP, VVIP, Enterprise, or whatever fits your event.
-
Each tier holds:
- A name
- A price
- An optional image
- An optional discount code
- A ticket message
The ticket message
Every tier has its own ticket message. There is also a global ticket message that applies to all tickets.
This is the text an attendee reads with the ticket, so use it for the things they need to know: the door opens at this time, bring this ID, dress code, where to park.
Require authorization before purchase
This setting is optional. Turn it on and the buyer has to be a signed-in Evittone user. Turn it off and a guest can buy without an account.
Who should turn it on
If you are running check-in by QR code, requiring authorization means every ticket in the door queue belongs to an account you can verify.
Payments
Payments go through Paystack. An attendee can pay with:
- Mobile money through MTN, Telecel, or AirtelTigo
- Card
What the attendee gets
Buying a ticket gives the attendee a QR code. At the event, that QR code is scanned to verify the ticket was genuinely bought.
This is the whole trust model: a ticket that was not paid for cannot produce a valid QR code, so a scanned ticket is proof of purchase.
Seats against tickets
Seat booking is a free reservation. It has no deadline, and it gives no entry. An attendee with a booked seat and no QR code cannot get into the event.
When the paid tickets fill capacity, the unpaid booked seats are released to paying buyers.
So the order matters:
- Attendees book seats to hold a place.
- Attendees buy tickets to get in.
- Once the event is at capacity from paid tickets, the seats that were never paid for are released.
Setting up seats
You can set seats up two ways.
Add seats manually. One by one, when you need specific names or a specific layout.
Auto-generate seats. Give a prefix and a start and end number, and Evittone builds the list. A prefix of A with 0 to 100 gives A0, A1, A2, and so on. You get a preview before you commit it.
In both cases, a seat that has been taken shows as taken.
You can disable seat booking afterwards, for example when a late release of tickets has made the seating plan irrelevant.
Refunds
Refunds are not automatic. An attendee requests a refund, and you approve it. Attendees can file complaints, and an approved refund returns to the original payment method.
See Dashboard and earnings for where you handle refunds.
Outsold
When the tickets sell out, the event is marked as having outsold its tickets and exceeded its target.
What attendees see
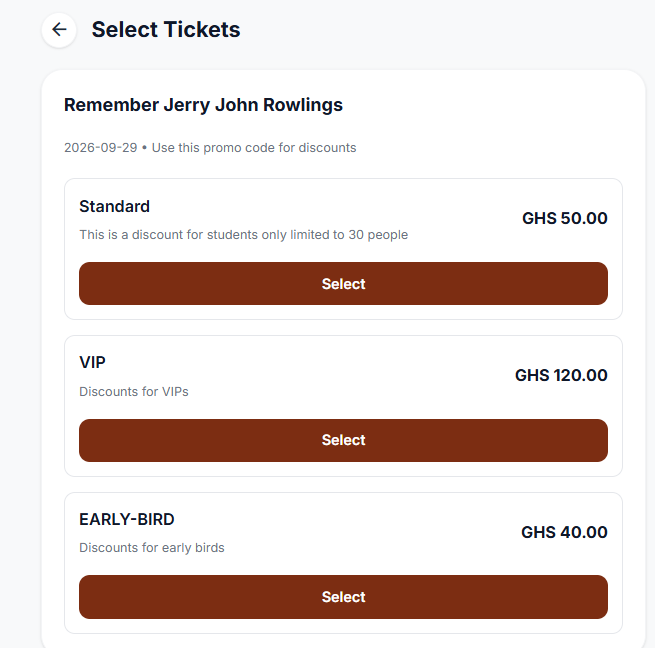
- The tiers you created, each with its name, price, and image.
- The discount code box, when you have set one.
- The ticket message, on the tier it belongs to or the global one.
- The ticket itself, with a QR code.
- On a sold-out event, the outsold marker, so they know not to expect a ticket.
Tips
- Name tiers the way your audience talks. “Standard” is the first tier; the rest are yours.
- Put the door time in the ticket message, not in the description. It is the last thing an attendee reads before they arrive.
- Do not use seats as a substitute for tickets. A seat does not get anyone in.
- If you are close to capacity, watch the seats booked against tickets purchased on the event stats, so the release does not surprise you.